CONVERTING CANON VIDEO FILES (.MOD) FOR USE IN ADOBE PREMIERE
In order to use video clips from our class Canon cameras in Premiere Pro CS4, you need to convert the files to a format that is fully compatible with our software. The process is fairly easy. Just follow the instructions below to complete the conversions.
STEP ONE - ORGANIZING FILES
You will need to create a folder on the computer's D drive (D:\Work) for your video projects. It should be named "GROUP ___ VIDEO" - do not use punctuation or symbols in the folder name.
STEP ONE - ORGANIZING FILES
You will need to create a folder on the computer's D drive (D:\Work) for your video projects. It should be named "GROUP ___ VIDEO" - do not use punctuation or symbols in the folder name.
- Inside this folder, you will create 3 subfolders - see diagram below. You will create a CONVERTED VIDEO FILES folder that will become the destination for your changed files.
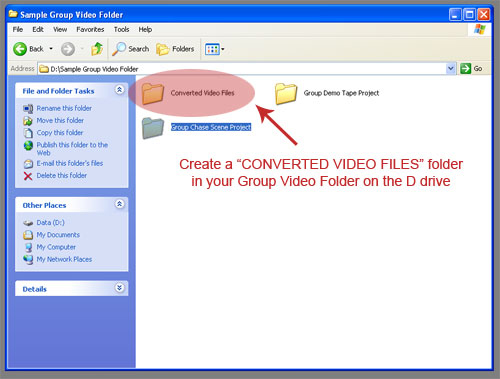
- You should also create a folder called "SOURCE FILES" in your group project folder.
STEP TWO - COPYING FILES FROM THE CAMERA
- Remove the SD Card from the Canon camera, and insert card into the card reader. When the card reader is connected to the computers USB port, the SD card will "read" similar to a memory stick. The card reader will often have drive "G" assigned to the device (SD card/reader).
- Open the "G" drive and find the folder "SD_VIDEO." Open this folder. You may see a number of folders named "PRG_ _ _." Open these folders to find the video clips you need to transfer.
- Select ALL the files you need to move to the computer. Copy these files and paste them into the "SOURCE FILES" folder in your group folder on the "D" drive. It is also wise to create folders or rename files either using the day or the scene number as part of the name. This will prevent copying over files that are downloaded from the SD card with the same name.
- Make sure all files are copied correctly. If everything is moved, you can delete the original files from the camera (although this step isn't necessary).
- NOTE - If you do not copy files each day, these will likely be deleted by another class! Don't say we didn't warn you!
STEP THREE - CONVERTING FILES USING ADOBE MEDIA ENCODER CS4
- Start Adobe Media Converter (found in the Video Tools folder in our class folder).
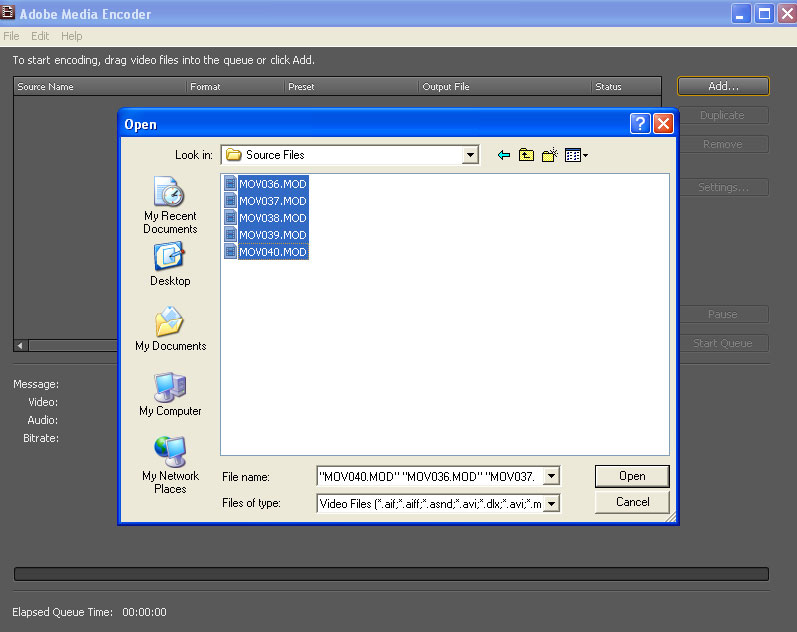
- Click the "ADD" button in the top right of the Encoder window. Use the Open window to navigate to your "Source Files" folder. Select all the .MOD files you need to convert (see below). Click open.
All the clips should appear in the Media Encoder window (see illustration below).
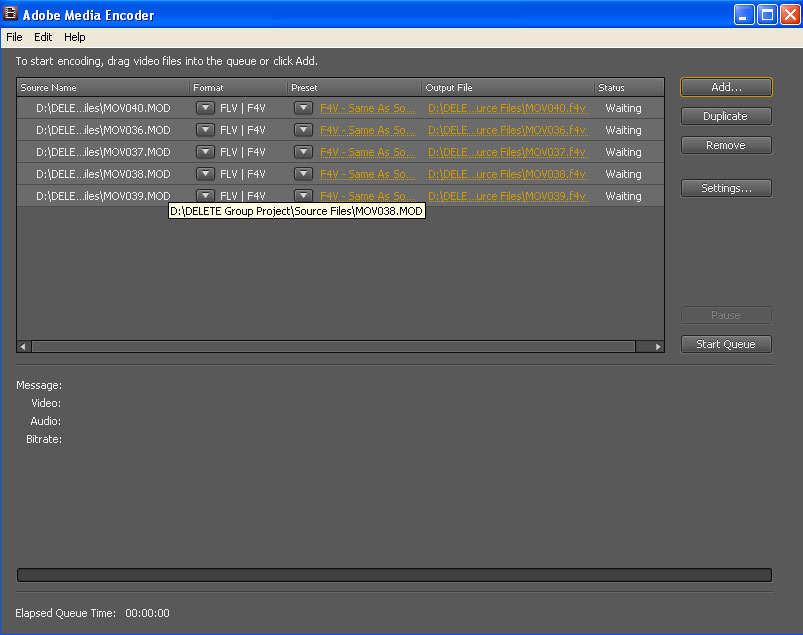
- Click on the OUTPUT NAME file (yellow text) and navigate to the "CONVERTED FILES" folder you created in your group video folder on the D drive.
- Click SAVE. Make sure all your settings match the illustration below (Video and Audio are checked, etc.).
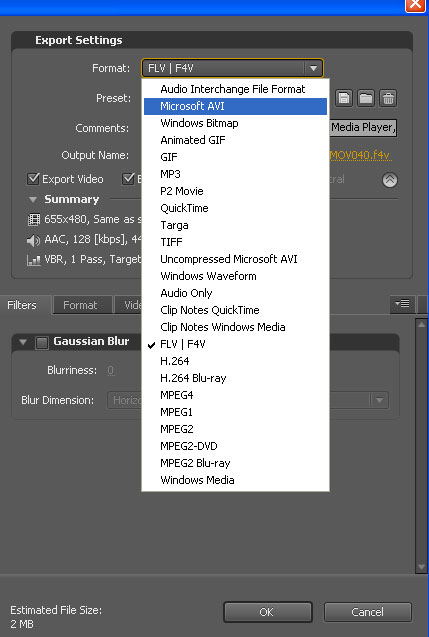
- NOTE: Click on the video settings tab, and select the "Cinepack" Codec.
- Click OK to return to the main Media Converter screen.
- For each file listed in the Media Converter window, click on the OUTPUT FILE link (yellow text) and make sure you select the same CONVERTED FILES folder you used above. Do this for ALL clips
- After changing the OUTPUT FILES to the correct folder, you are now ready to convert all the clips.
- Click the START QUEUE button and the program will automatically begin converting all selected clips. It may take a little time to process. Once finished, you can close Media Encoder and load Adobe Premiere Pro CS4.
STEP 3 - IMPORTING CONVERTED FILES INTO PREMIERE PRO CS4
- Load Premiere from the shortcut in our class video folder. From the opening screen, choose NEW PROJECT (or Open Project if you are opening a previously started video).
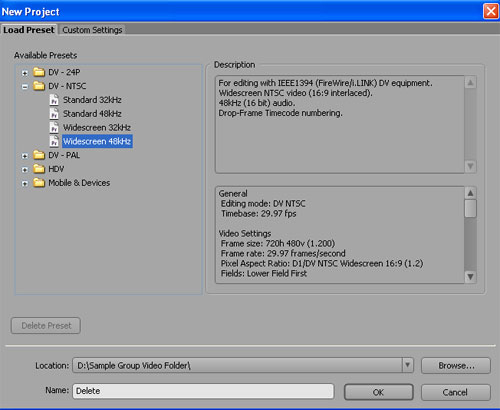
- If you've chosen NEW PROJECT, you will need to setup the video for editing. See the illustration below for correct settings. NOTE - you will need to choose either Standard or Widescreen depending on how you've filmed your video. Make sure the project is set to save to your "D" drive video folder and NOT "My Documents." Digital video files are huge and you don't have enough storage capacity in your account.
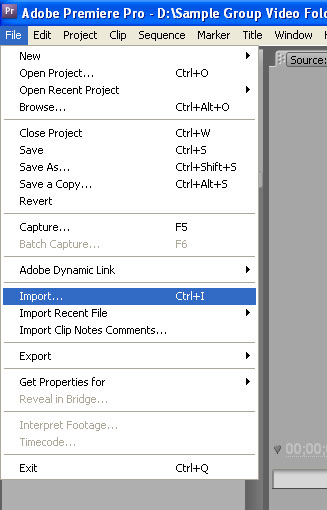
- Now you are ready to begin work on your project. You'll need to import your converted clips into Premiere first. To do this, open the File menu and choose Import (see illustration below). Navigate to the folder where you exported all your clips and select them to import. You can import one at a time or the entire library.