Video Unit - Demo Tape
VIDEO UNIT - DEMO TAPE INSTRUCTIONS
Your instructor will provide you with a copy of the Demo Tape Skills Sheet in class. You and your group members will use this as a guide to complete a short demo video that demonstrates proper camera handling techniques and basic video editing.
CLICK HERE to download a PDF copy of the updated assignment sheet.
You have approximately 2 classes to film all required shots. You will then copy all required footage to your editing computer. To do this, you will need to create a group folder on your computer's "D" drive (named "Group ___ Video"). Make sure you are aware of which computer you have uploaded your footage to, as the "D" drive is NOT accessible through the school's network.
Important File Transfer Information:
Working With Adobe Premiere Pro CS4:
Demo Tape Specifications:
Your instructor will provide you with a copy of the Demo Tape Skills Sheet in class. You and your group members will use this as a guide to complete a short demo video that demonstrates proper camera handling techniques and basic video editing.
CLICK HERE to download a PDF copy of the updated assignment sheet.
You have approximately 2 classes to film all required shots. You will then copy all required footage to your editing computer. To do this, you will need to create a group folder on your computer's "D" drive (named "Group ___ Video"). Make sure you are aware of which computer you have uploaded your footage to, as the "D" drive is NOT accessible through the school's network.
Important File Transfer Information:
- You will need to plan for approx. 15-20 minutes of class time each day to copy footage off your camera (best to do before the end of the period). This is important as other classes may be sharing these cameras and you could lose your footage.
- Remove the SD Card from the Canon camera, and insert card into the card reader. When the card reader is connected to the computers USB port, the SD card will "read" similar to a memory stick. The card reader will often have drive "G" assigned to the device (SD card/reader).
- Open the "G" drive and find the folder "SD_VIDEO." Open this folder. You may see a number of folders named "PRG_ _ _." Open these folders to find the video clips you need to transfer.
- You will need to copy the MOD and MOI files from the camera. The MOD files are the video files that you will need to convert into AVI format for use with Premiere Pro CS4. Click here to view instructions on how to convert your files (Adobe Media Encoder).
- Make sure all footage has copied correctly before disconnecting the camera. Once all files have been transfered successfully, please DELETE the files from the camera to free up memory space for the next groups to work with the equipment.
Working With Adobe Premiere Pro CS4:
- Premiere Pro is a very powerful video and audio editing program that allows you to create outstanding projects. It is a relatively easy program to learn, but you do want to take the time to understand the fundamental skills required to edit professional quality videos.
- To get you started, CLICK HERE to view the Adobe Premiere Pro CS4 Student Intro Guide (PDF File). There is also a copy of this saved in the class Video & Audio Production Folder.
Demo Tape Specifications:
- Make sure you and your group members have recorded all the necessary shots from the Demo Tape Checklist. You are strongly recommended to record multiple takes of each shot type so you can choose the best ones for the final video. Each shot should be 4-5 seconds in length.
- After uploading video to the computer and converting the files as required, import the clips into Premiere (to help you get started, CLICK HERE to view conversion and project set-up instructions).
- You will leave 3 seconds of black video at the start of your project (leave blank space in the timeline). The video will start with a fade-in to an opening title screen (shows group number and members' names). The title will remain on screen long enough to be easily read. It will fade out to black video.
- Each clip will feature an intro title slide (can fade or transition in to video clip as you desire). Each demo video clip will be carefully editing/trimmed to only show the required shot.
- You do NOT need accompanying audio for this activity, although you may choose to add music. If music is used, it must be a legal copy and it should fade in and out as needed (no abrupt cuts).
- At the end of the demo tape, include a short credits screen that shows all names/positions and fades out to black video at the end.
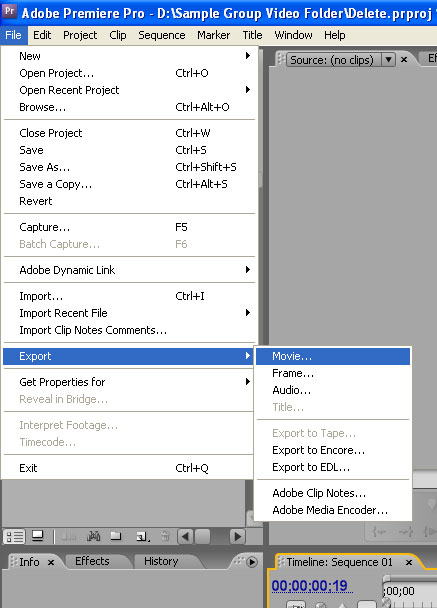
- You will render your final project as a DV AVI file. To do this, open the file menu and choose EXPORT-MOVIE (see illustration below).
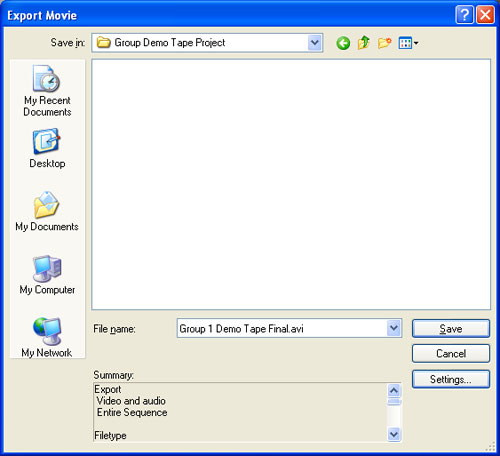
- From the Export window, select your group demo video folder as the destination for your final rendered video. Click on the SETTINGS button in the bottom right of the window. Make sure your settings are the same as those in the illustration below.

- Click OK after checking settings. Make sure you have the destination location selected correctly and hit SAVE (see illustration below). Make sure the final rendered file is named correctly (as in the example shown).
- Test the final rendered video to ensure it plays as expected. Open your group demo tape folder, find the final rendered video and double-click on it to open it in Windows Media Player (default player on the school network). It should play back properly. If not, double-check your settings in Premiere and re-export.
- If the tested video works properly, copy the final rendered AVI file to our class GROUP WORK folder. Congratulations! You're finished the Demo Tape Challenge!